
Step 1
Go to Visitor Workflows in the left navigation, then select Create New to start a new visitor type, or open an existing one from the list. Each visitor type, such as Regulatory Authority or Job Applicant, is its own workflow with its own resources, settings, and notifications. The list shows how many Checkpoints each one is assigned to.

Each visitor type is its own row; use Create New at the top right, and check the Checkpoints count on each row.
Step 2
In the workflow's Settings, name the Visitor Workflow, then turn on the options you need such as Require Additional Information, Require ID Scan, and Show Host List. Require Additional Information lets you add a labeled field like Company Name. The Resources section above lists the steps a visitor completes, such as an NDA or a Visitor Agreement.
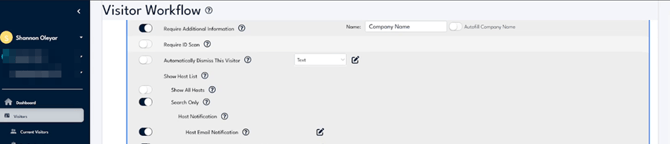
Focus on the Require Additional Information, Require ID Scan, and Show Host List toggles at the top of Settings.
Step 3
Scroll to Host Notification and turn on the channels you want, including Host Email Notification, Host Text Message Notification, Host Microsoft Teams Notification, and Host Slack Notification, then set the Check-In Completion Message and Enable Auto-Checkout Text. Host notifications tell the right person when a visitor arrives. Enable Auto-Checkout Text adds a checkout reply option to the visitor's confirmation, and you can also set an Override Auto Checkout Time.
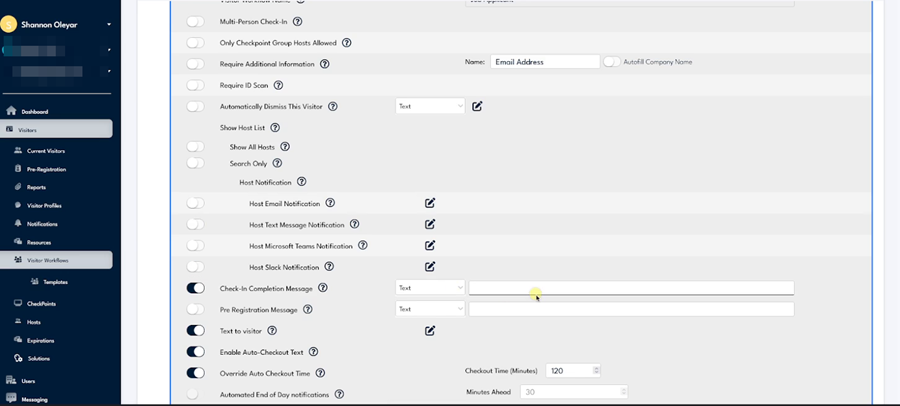
Turn on the notification channels under Host Notification, then set the Check-In Completion Message and Auto-Checkout options below.
Step 4
Add or open a Badge resource and toggle the fields to print, such as Check-In Name, Host Name, Check-In Type, and Check-In Photo, then review the live Badge Preview. The toggles in Choose from the options below control what appears on the printed badge. The Badge Preview on the right updates as you change the fields. Select Save Changes when it looks right.
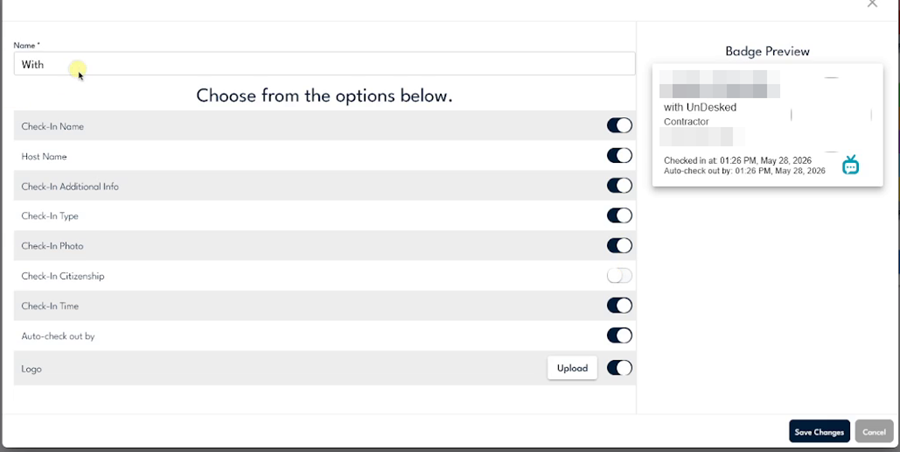
Toggle each field on the left; the Badge Preview on the right updates instantly to show the printed result.
Step 5
Open CheckPoints, select a CheckPoint, and use Settings to set the kiosk fields such as Check-In, Check out, Quick Drop Off Button, and Pre Registration, and to set the Auto Check-out time. A CheckPoint is a physical entry point, like a Lobby kiosk. The Theme section below lets you set the background, logo, and colors that visitors see at that door.
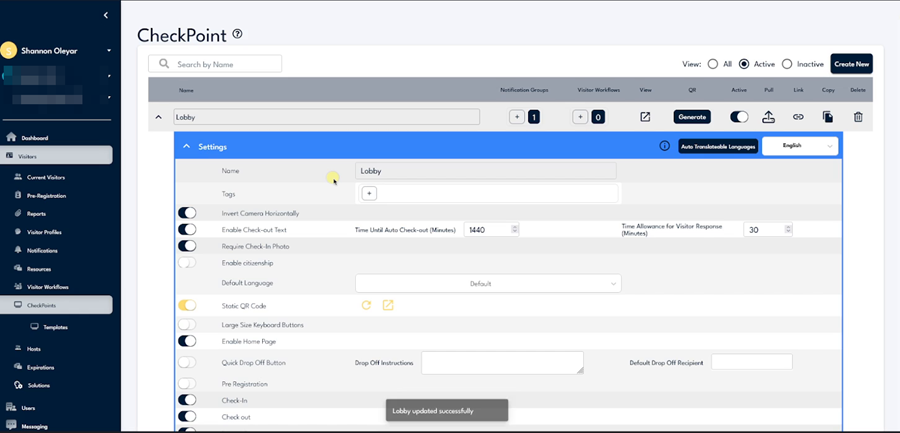
Expand a CheckPoint row to reach Settings, where the Check-In, Check out, Quick Drop Off Button, and Pre Registration kiosk fields live.
Step 6
From the CheckPoint list, confirm the Visitor Workflows count for each device, then select Generate to create the QR code for that CheckPoint. Only the visitor workflows you assign to a CheckPoint appear at that door. The QR code lets visitors check in from their phone at the same time as the kiosk.

Check the Visitor Workflows column for each device, then use the Generate button to produce that CheckPoint's QR code.