
Step 1
• Roles let you give a person admin access to only the parts of UnDesked they need for their job. For example, a front office team may need to see who is currently checked in without changing any visitor settings, or a maintenance team may run employee workflows every day but never interact with visitors. Instead of customizing each person one at a time, you build the permission set once as a Role and reuse it. To get started, click Settings in the left navigation, then select the Roles tile.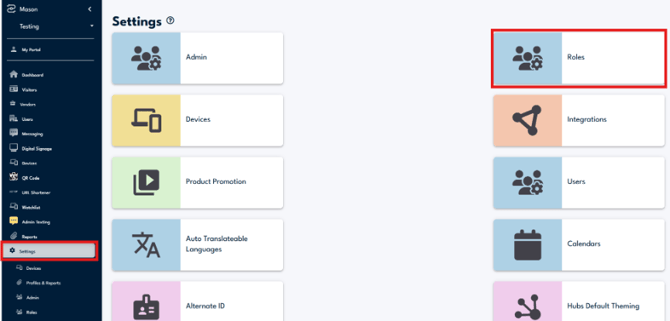
Open Settings and select Roles to manage reusable permission sets.
Step 2
• The Roles page lists every role at this location, with one column for each area of the platform: Visitor, User, Vendor, Texting, QR Code, Emotii, and Digital Signage. If no roles exist yet, the table reads "No data found." Click Create Role in the top right corner and give the role a clear name that describes the job it supports, such as Front Office or Maintenance.
Click Create Role to start a new permission set.
Step 3
• Each area of the platform can be set to one of three permission levels. Edit (green) lets the person view and make changes in that area. View (yellow) lets the person see the area but not change anything. Not Visible (orange) hides the area from the person entirely, so it does not appear in their navigation. To change a permission, click the colored cell on the role's row and choose Edit, View, or Not Visible from the dropdown. In the example below, the Supervisor role has every area set to Not Visible, while the Security role can view visitors, users, vendors, and QR codes, and can edit Texting and Digital Signage. Leave Emotii set to Not Visible, since it is a legacy feature. Use the pencil icon on a row to edit a role later, or the trash can icon to delete it.
Each column is set to Edit, View, or Not Visible for that role.
Step 4
• The Visitor, User, and Digital Signage columns have an arrow beside their name. Click the arrow to expand the section and set permissions for each individual feature inside it, rather than for the whole section at once. In the example below, the Supervisor role has the overall Visitor section set to Not Visible, but Current Visitors set to View, so a supervisor can see who is on site without access to anything else in visitor management. The expanded Visitor section includes Current Visitors, Visitor Reports, Pre-Registration, Notifications, Media, Tests, Surveys, Badges, External URL, Visitor Upload, Acknowledgment & Agreements, and Visitor Workflow. Scroll right to see every column, and click the arrow again to collapse the section.
Expand the Visitor section to set each visitor feature separately.
Step 5
• Expand the User section the same way to control the employee side of the platform. Its features are User Check-In, User Reports, User Profiles, Notifications, Media, Tests, Surveys, Badges, External URL, User Upload, Acknowledgment & Agreements, and Workflow. Both Visitor Workflow and Workflow can be expanded one level further to list each workflow individually, so you can grant access to specific workflows only. For a maintenance team, for example, set the Visitor section to Not Visible, then under User set Workflow to Edit and turn on only the maintenance workflows they run.
Step 6
• Expand the Digital Signage section to set permissions for My Library, Dashboard, Bulletin, and Channels separately. This is useful when someone should upload and manage content in My Library but should not change which channels play on your screens. The Vendor, Texting, and QR Code columns do not expand and are set as a single permission. Keep in mind that if a role needs to send emergency messages, Texting must be granted on the role, even when the person already has access to Current Visitors.
Step 7
• Here are common roles UnDesked customers have built, with the permissions each one uses. Start from the one closest to your need, then adjust it to fit your site. Any area not listed should be set to Not Visible.
- Shift Supervisor (after hours and emergencies): Current Visitors set to View and Texting set to Edit. The supervisor can see who is in the building and send emergency texts, but cannot open visitor reports or change any settings.
- Muster or Emergency Headcount: Current Visitors set to Edit and Texting set to Edit, with Visitor Reports set to Not Visible. The person can account for everyone on site and check people out during a drill without seeing visit history.
- Shipping and Receiving: Current Visitors set to Edit and Texting set to Edit so the team can text drivers and move them through the dock queue. Under Visitor Workflow, set only the shipping and receiving workflow to Edit and every other visitor workflow to Not Visible.
- Front Office or Visitor Coordinator: Current Visitors and Visitor Reports set to View. The person can see who is checked in and look up past visits, but cannot change anything.
- Workplace Experience or Facilities Team: Visitor and User both set to Edit, with Texting, QR Code, and Digital Signage set to Not Visible. The team manages visitors and employees day to day without touching communications.
- Digital Signage Content Reviewer: Digital Signage set to Edit and every other area set to Not Visible. The person can work on signage content without seeing visitor or employee information.
Step 8
• Once the role is saved, assign it to a person. Go to Settings, then Admins, click Create New, select the person, and choose the role. The person must already exist as a user at the location before you can give them a role. A role is granted one location at a time, so repeat this at each location where the person needs access. The next time they log in, they will only see the areas the role allows.