
1. Introduction
This guide describes how the UnDesked and HPE Aruba Central integration works, what is supported, and how to configure, validate, and troubleshoot it in an existing HPE Aruba infrastructure. Throughout this guide, 'Aruba Central' refers to HPE Aruba Networking Central. This guide covers the Classic Central platform; a companion guide covers the New Central platform of this integration.
2. Solution Overview
UnDesked is a cloud visitor management platform (kiosk check-in, pre-registration, notifications, badges, check-out). This integration adds automated guest Wi-Fi onboarding: at check-in, UnDesked creates a temporary guest account on the customer's Aruba Central Cloud Guest captive portal.
How the visitor experiences it
1. Visitor checks in (kiosk, contactless, or a pre-registered visitor completing check-in) and provides a mobile number. Pre-registration alone does not issue credentials.
2. An SMS arrives with the SSID, a username, and a password.
3. Visitor joins the guest Wi-Fi and signs in on the captive portal.
4. Access stays valid for the visit (per the kiosk's check-out settings).
5. At check-out, the account is removed automatically.
Benefits
• Zero-touch: no manual creation, hand-out, or cleanup of guest credentials.
• Unique credentials: each visitor receives their own username and password for each visit.
• Traceable: every guest account maps to a visitor record.
Technical approach
• Uses the Classic Central REST APIs (API Gateway, OAuth 2.0) and the Guest Management API v1 to create, verify, and delete visitor accounts.
• Accounts live on a Cloud Guest splash page; the guest SSID uses it as an external captive portal.
• UnDesked does not manage access points, WLANs, or network policy, and it needs no BLE, IoT Connector, or on-premises components.
• Network access control stays on the Aruba side: the APs assign each guest a role and enforce its access policies (see section 3.5).
3. Solution Architecture
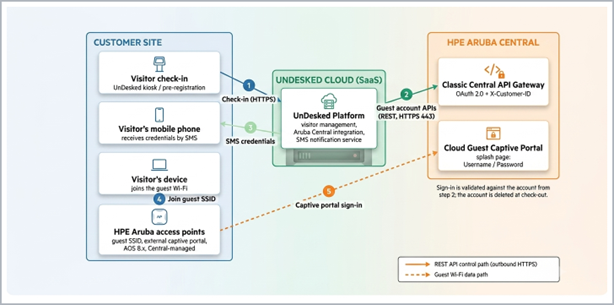
Figure 1. Solution architecture and integration points.
Flows, matching the numbered badges:
1. Check-in at a kiosk (HTTPS to the UnDesked cloud).
2. UnDesked calls the Classic Central API Gateway to create the account at check-in, verify and reuse it on a repeat check-in, and delete it at check-out.
3. Visitor receives the SMS credentials.
4. Visitor's device joins the guest SSID; the AP redirects to the Cloud Guest captive portal.
5. The portal validates the sign-in against the account from step 2.
All integration traffic is outbound HTTPS from the UnDesked cloud: no inbound access, no firewall changes.
3.1 Components and Roles
|
Component |
Role |
Communication |
|
UnDesked Cloud Platform (SaaS) |
Visitor management; Aruba Central integration; SMS notifications |
Outbound HTTPS 443 to the regional API gateway; SMS via messaging provider |
|
HPE Aruba Central (Classic Central) |
Hosts the API Gateway and Cloud Guest splash pages |
Receives REST calls; manages the customer's APs |
|
Cloud Guest captive portal (Username/Password) |
Guest sign-in page; holds the visitor accounts |
Validates guest Wi-Fi sign-ins |
|
Aruba access points (Central-managed) |
Broadcast the guest SSID with external captive portal security; enforce guest access policies (built-in stateful firewall) |
Managed by Central (existing deployment) |
|
Visitor's mobile phone |
Receives the Wi-Fi credentials |
SMS |
3.2 Deployment Models
Generally, any Aruba Access Point running AOS 8 or AOS 10 is supported, as long as it is managed under Classic Central.
|
Deployment model |
Status |
Notes |
|
AOS 8 – Central Managed, Cloud Guest external captive portal |
Supported |
Validated model. |
|
AOS 10 – Central Managed, Cloud Guest external captive portal |
Supported |
Validated model. |
|
AOS 8 – Controller Managed |
Not supported |
Controller-hosted / ClearPass portals are not supported; Cloud Guest only. |
|
New Central (Central NAC captive portal) |
Supported separately |
Covered by the companion New Central SIG; the platform is selected per organization in UnDesked; one platform is active at a time. |
3.3 Support Matrix
|
Component |
Version(s) supported |
Notes |
|
UnDesked Visitor Management |
Current SaaS release |
Continuously delivered |
|
HPE Aruba Central |
Classic Central (current SaaS release) |
Classic Central UI and REST API framework |
|
Guest Management (Cloud Guest) API |
v1 (/guest/v1) |
Splash page type Username/Password required |
|
Access points / AOS |
AOS 8.x and AOS 10.x, Central-managed |
AP models per the customer's Central subscription |
|
SMS delivery |
UnDesked notification service |
Visitor mobile number required |
• Long Supported Releases (LSR) and Short Supported Releases (SSR) are both supported. Check the HPE Networking Support Portal (Software End of Life) for current software status.
3.4 REST API Usage
All calls target the customer's regional Classic Central API Gateway; Guest API calls carry the Authorization: Bearer and X-Customer-ID headers:
|
Endpoint |
Purpose |
When called |
|
POST /oauth2/token (grant_type=refresh_token) |
Refresh the access token; rotated pair persisted by UnDesked |
On HTTP 401; daily schedule |
|
GET /guest/v1/portals |
List Cloud Guest splash pages (paginated, 100/page) |
Setup ('Fetch Portal List') |
|
POST /guest/v1/portals/{portal_id}/visitors |
Create the guest account (name, password, valid_till_days) |
Check-in |
|
GET /guest/v1/portals/{portal_id}/visitors/{visitor_id} |
Verify an existing account before reuse |
Repeat check-in |
|
GET /guest/v1/portals/{portal_id}/visitors?filter_by=name&filter_value=<username>&limit=10 |
Find stale accounts with the same username |
Before creation (dedup) |
|
DELETE /guest/v1/portals/{portal_id}/visitors/{visitor_id} |
Delete the guest account |
Check-out; dedup |
3.5 Guest Network Security
This integration creates the guest credentials; network security enforcement for guest traffic happens on the Aruba side. Aruba access points include a built-in stateful firewall that can inspect and control traffic up to Layer 7: every client that joins the guest SSID is assigned a role, and the enforcement policies attached to that role define what the client can reach. Enforcing policy at the AP applies security closest to the source, before guest traffic reaches the rest of the network.
Recommendations for the guest SSID
• Segment the guest network: place the guest SSID on a dedicated guest VLAN/subnet, separated from internal networks. Never expose subnets that carry internal resources to guests.
• Apply an explicit rule set: on the SSID's Access tab (step A2), use Network Based (one uniform rule set for every guest) or Role Based rules. Do not run a guest SSID as Unrestricted.
• One role per SSID: with the built-in captive portal, every client on an SSID receives the same role and rule set. Visitors who need different privilege levels (for example, standard guests and contractors) need their own SSID and captive portal. In UnDesked, assign the matching captive portal to each workflow in the location's Configure Workflows dialog (step C).
Example baseline (Network Based)
A minimal rule set for a guest SSID. Rules are processed top to bottom: service allows first, then the internal-network denies, then a final allow for the internet.
|
# |
Rule |
Purpose |
|
1 |
Allow dhcp to all destinations |
IP address assignment on the guest VLAN |
|
2 |
Allow dns to all destinations |
Name resolution |
|
3 |
Deny any to network 192.168.0.0/255.255.0.0 |
Blocks internal (RFC 1918) addresses |
|
4 |
Deny any to network 172.16.0.0/255.240.0.0 |
Blocks internal (RFC 1918) addresses |
|
5 |
Deny any to network 10.0.0.0/255.0.0.0 |
Blocks internal (RFC 1918) addresses |
|
6 |
Allow any to all destinations |
Outbound internet access |
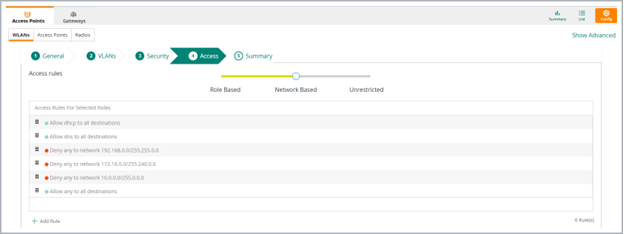
Figure 2. Access tab: example Network Based rule set for a guest SSID.
Adjust the internal ranges to your addressing plan, and add content filtering or deep packet inspection per company policy.
IMPORTANT: this integration automates guest accounts only; UnDesked never changes Aruba-side network policy. The example above is a starting point, not a complete policy: define the actual rule set for the guest SSID with your network or security team.
4. Solution Configuration – Config/Verification/Troubleshooting Workflows 4.1 Prerequisites
• HPE GreenLake account with admin access to the Central workspace (Classic Central available).
• A guest SSID broadcast by the Aruba APs, secured by an external captive portal.
• A working guest network topology: DHCP and DNS on the guest VLAN/subnet, routing to the internet, and access rules per section 3.5.
• A Cloud Guest splash page of type Username/Password.
• An UnDesked user with Admin permission on Integrations at the organization level. The Aruba Central card appears under Settings > Integrations only while the organization, not a location, is selected.
• Check-in captures the visitor's mobile number (credentials are delivered by SMS).
Values collected from Aruba Central during Step A:
|
# |
Value |
Where to find it |
|
1 |
Client ID |
Organization > Platform Integration > REST API > System Apps & Tokens |
|
2 |
Client Secret |
Organization > Platform Integration > REST API > System Apps & Tokens |
|
3 |
Customer ID |
Profile panel (top-right user icon) |
|
4 |
Token file (JSON) |
Token List > Download Token |
|
5 |
Region |
API Gateway domain |
|
6 |
SSID |
Devices > Access Points > Config > WLANs |
4.2 Configuration Workflow
4.2.1 Step A: Prepare Aruba Central
A1. Sign in and open Classic Central
• Sign in at common.cloud.hpe.com and launch HPE Aruba Networking Central from 'My services'.
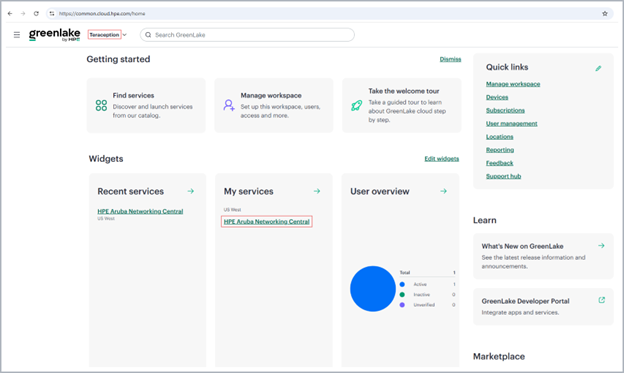
Figure 3. Launching HPE Aruba Central from the HPE GreenLake workspace ('My services').
• Toggle Classic Central ON (top-right).
• Select the Group (top-left), for example 'default'.
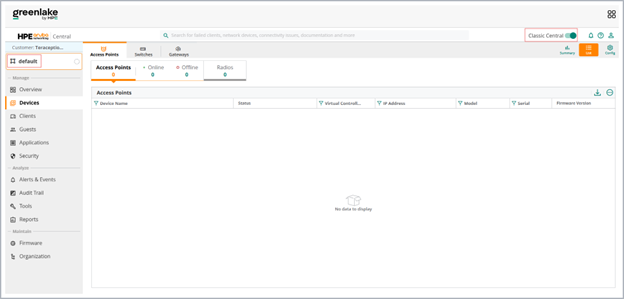
Figure 4. Classic Central with the Classic Central toggle on and the configuration group selected.
A2. Confirm the wireless network (SSID)
• Go to Devices > Access Points, click the Config (gear) icon, then open the WLANs tab.
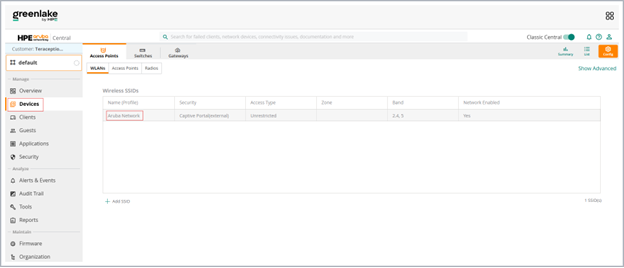
Figure 5. Devices > Access Points > Config, WLANs tab: the guest SSID with Captive Portal (external) security.
• Confirm the guest network is enabled and note the exact SSID. If there is no guest network, click + Add SSID to create one.
• In the WLAN's Security tab, set Security Level to Visitors, Access Network Type to Cloud Guest, and Guest Captive Portal Profile to the splash page you confirm in step A3.
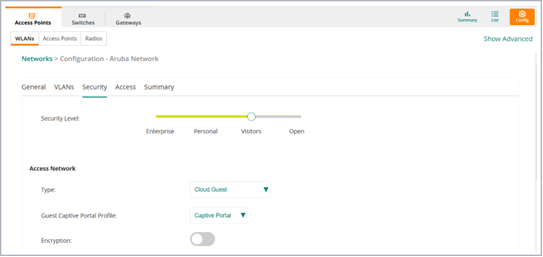
Figure 6. SSID configuration: Security Level 'Visitors', Access Network Type 'Cloud Guest', Guest Captive Portal Profile selected.
• Encryption off (Key Management Open or Enhanced Open): guests join the SSID without a Wi-Fi passphrase and then sign in on the Cloud Guest captive portal with the credentials from the SMS.
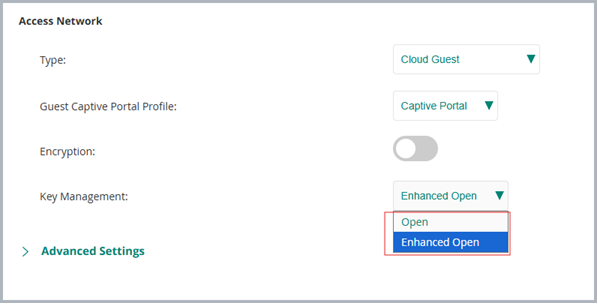
Figure 7. Encryption off: Key Management 'Open' or 'Enhanced Open', no Wi-Fi passphrase required.
• Encryption on (Key Management WPA3-Personal): guests must enter the shared Wi-Fi passphrase to join the SSID and then still sign in on the Cloud Guest captive portal with the credentials from the SMS.

Figure 8. Encryption on: Key Management 'WPA3-Personal', a shared passphrase is required before the captive portal login.
IMPORTANT: the Wi-Fi passphrase (if Encryption is on) is shared across devices and separate from each visitor's SMS username/password; guests need both to get on the network.
• On the Access tab, choose the Access rules mode for the SSID. This is Aruba-side network policy; choose it for your use case:
• Role Based: a separate rule set for each role.
• Network Based: one rule set applied uniformly to every client on the SSID.
• Unrestricted: the AP enforces no access rules; clients reach whatever the network's routing and firewall allow. Do not use this for a guest SSID unless segmentation or firewall policy elsewhere already isolates guest clients from internal resources.
• Keep the guest SSID on a segmented guest network with an explicit rule set; recommendations and an example baseline are in section 3.5.
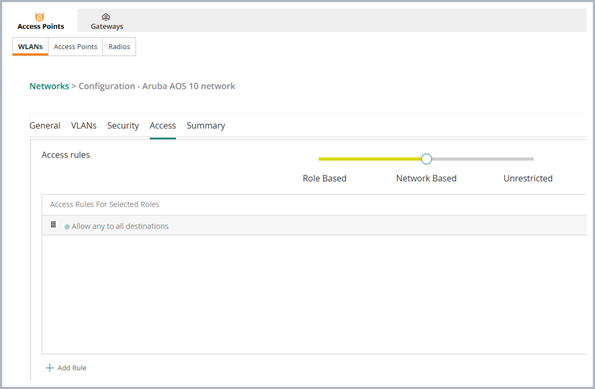
Figure 9. Access tab: Role Based, Network Based, and Unrestricted Access rules modes.
A3. Confirm the captive portal (splash page)
• Go to Guests > Splash Pages.
• Confirm a portal exists; note its name.
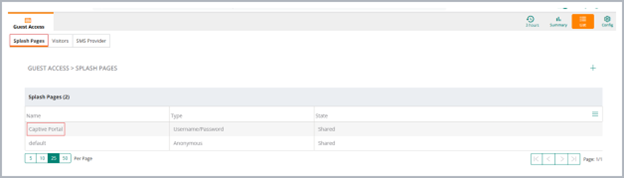
Figure 10. Guests > Splash Pages, list of captive portals.
• If no portal exists, click + and create one. Its type must be Username/Password.
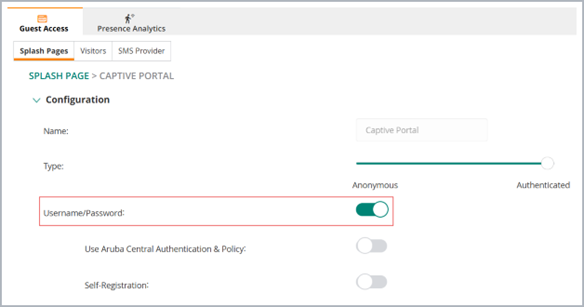
Figure 11. Splash page configuration with type Username/Password selected.
A4. Generate API credentials
• Go to Organization > Platform Integration > REST API > System Apps & Tokens.
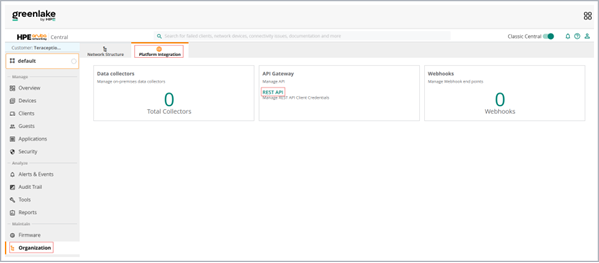
Figure 12. Organization > Platform Integration > REST API (API Gateway).
• Click + Add Apps & Tokens and create an app dedicated to UnDesked.
• Copy the Client ID and Client Secret from the app's row.
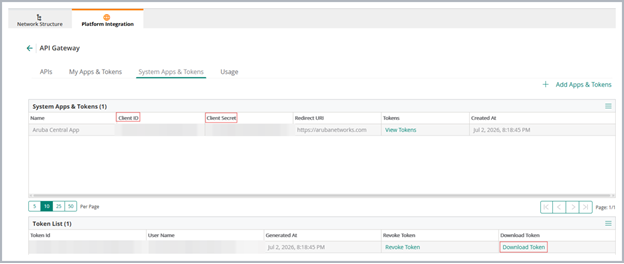
Figure 13. System Apps & Tokens: Client ID and Client Secret.
• In Token List, click Download Token to save the JSON file that contains the access and refresh tokens.
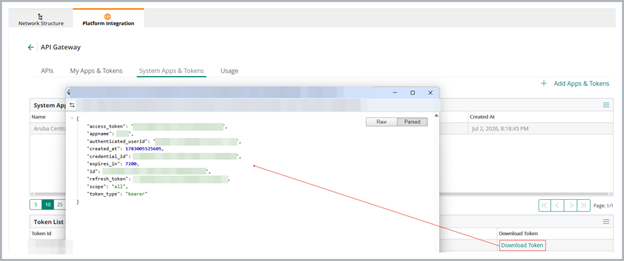
Figure 14. Token List: downloading the token file (JSON).
IMPORTANT: the token file is consumed at first use. UnDesked then refreshes and stores the tokens itself, so later edits to the integration do not need a token; leave the JSON Token field empty. Never paste the same file again: its refresh token is already spent and pasting it replaces the working tokens. Download a fresh token only if guest accounts stop being created (token regenerated or revoked in Central, or the integration left Disabled for about two weeks); see the 'Guest creation worked at setup, then stopped' row in section 4.4.
A5. Find the Customer ID
• Click the profile icon (top-right) and copy the Customer ID.
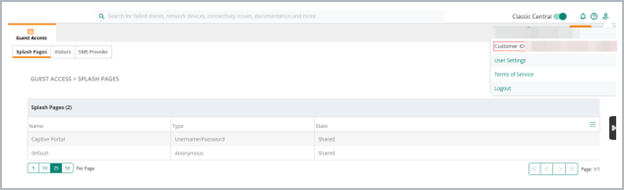
Figure 15. Customer ID in the account details panel.
A6. Identify the region
• Under REST API > APIs, note the API domain (for example app1-apigw.central.arubanetworks.com).
• Match the domain to a Region in UnDesked. A plain app.central.arubanetworks.com address maps to US-1.
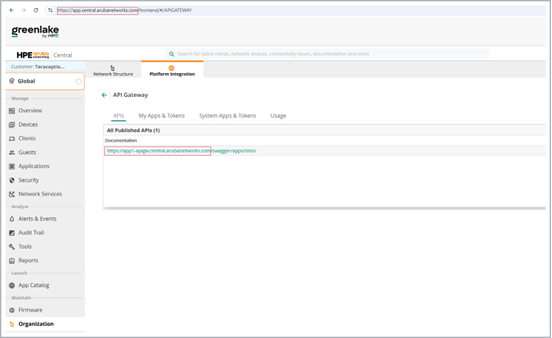
Figure 16. API Gateway APIs tab showing the regional API domain.
4.2.2 Step B: Configure the Integration in UnDesked
B1. Open the Aruba Central integration
• Sign in to UnDesked as an organization administrator.
• Open Settings > Integrations with the organization selected. On the Aruba Central card, click Configure; the Aruba Central Details dialog opens.
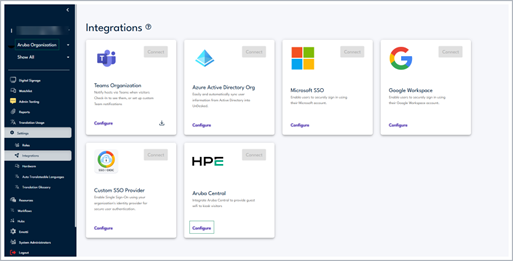
Figure 17. Organization-level Settings > Integrations with the Aruba Central integration card.
• The dialog opens on the Credentials tab. Under Aruba Central Platform, select CLASSIC CENTRAL; new integrations default to NEW CENTRAL.
• Each platform keeps its own credentials; switching the toggle never discards the other platform's saved values.
• Only one platform can be active per organization. The selected platform issues Wi-Fi credentials for every location and workflow, and switching the toggle and saving moves the whole organization to the other platform.
• After you switch the toggle on a saved integration, UnDesked shows the notice 'On Save, Classic Central becomes the active platform for every location in this organization.' (Figure 19). If the platform you are leaving has unsaved changes, UnDesked first asks 'Unsaved changes detected' and offers Discard Changes or Cancel.
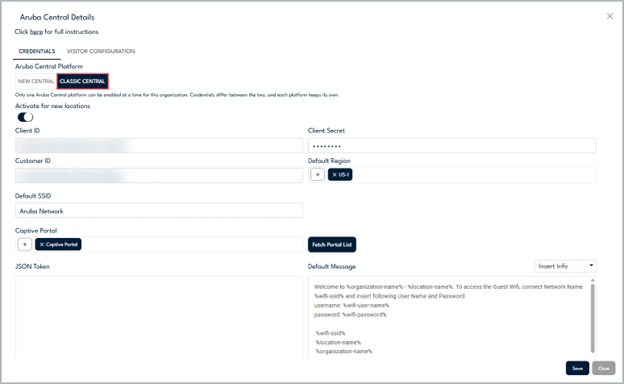
Figure 18. Aruba Central Details dialog: Credentials tab with the Aruba Central Platform toggle on CLASSIC CENTRAL.
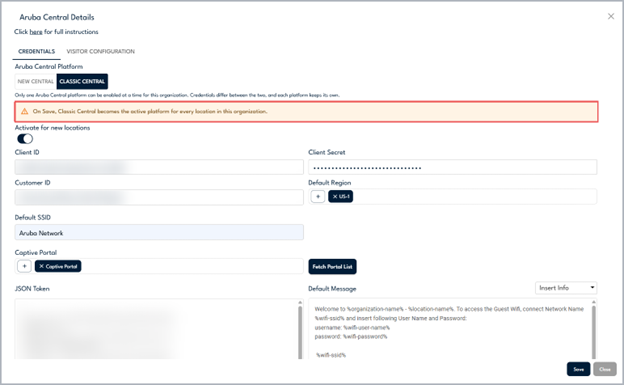
Figure 19. Notice shown after switching the platform on a saved integration; it stays until Save or until the toggle is switched back.
B2. Fill in the Credentials tab
|
Field |
What to enter |
|
Aruba Central Platform |
CLASSIC CENTRAL. |
|
Activate for new locations |
ON to auto-enable future locations. |
|
Client ID / Client Secret |
From step A4. |
|
Customer ID |
From step A5. |
|
Default Region |
US-1 is pre-selected for a new integration; click + to change it to the region from step A6. |
|
Default SSID |
Exact SSID from step A2 (shown to visitors in the SMS). |
|
Captive Portal |
Selected in step B3. |
|
JSON Token |
Paste the full contents of the token file from step A4. |
|
Default Message |
SMS template; personalize in step B4. |
• The token file is used once at setup. Afterwards UnDesked refreshes and stores the tokens itself, both when Aruba Central rejects a token and once a day. Secrets are stored encrypted on the UnDesked servers and masked in the UI.
B3. Fetch and select the captive portal
• Click Fetch Portal List. The button becomes active once the credentials and the JSON Token are filled in.
• Click + next to Captive Portal and select the Username/Password portal from step A3.
• Nothing is pre-selected. The field is required, and Save reports 'This field is required' while it is empty.
• If the list fails to load, re-check credentials and region (see section 4.4).
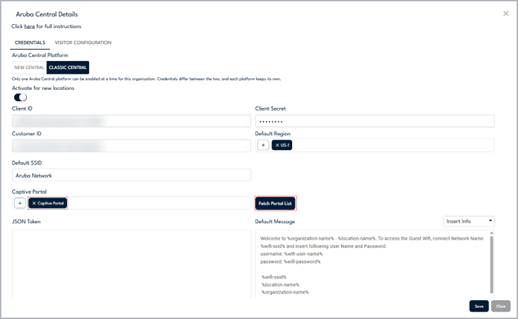
Figure 20. Fetching and selecting the captive portal in UnDesked.
B4. Personalize the default message (optional)
Placeholders (insert via Insert Info, or type %): %wifi-ssid%, %wifi-user-name%, %wifi-password%, %organization-name%, %location-name%, %visitor-name%, %host-name%, %checkpoint-name%, %cellnum%, %additional-info-(company)%.
IMPORTANT: always keep %wifi-ssid%, %wifi-user-name%, and %wifi-password% in the message; without them visitors do not receive their login details.
B5. Save
• Click Save. The button is enabled once a valid JSON Token is pasted.
• If Client ID, Client Secret, Customer ID, Default Region, or Captive Portal is empty, that field is marked 'This field is required' and nothing is saved.
• The card's status button now reads Connected (Figure 21).
• That button is also the integration's on/off switch. Clicking it shows Disabled and stops guest account creation, check-out deletion, and the daily token refresh for every location.
• If the integration stays Disabled for about two weeks, the refresh token lapses and a fresh token file is needed. Saving this dialog sets the button back to Connected.
• To pause a single site, use that location's Enabled switch (step C) instead.
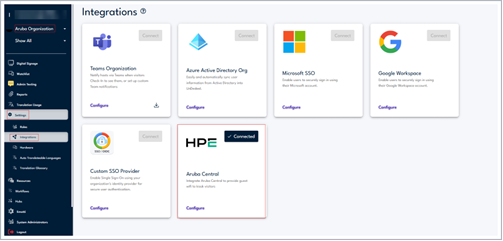
Figure 21. The Aruba Central integration card showing Connected after saving.
4.2.3 Step C: Per-Location Settings
• Click Configure again and open the Visitor Configuration tab; it appears only after the first Save.
• The tab lists one location per line. Search by location name and page through the list; 25 locations are shown per page by default, and you can choose 10 to 100.
• Toggle Enabled for each location (the switch in the column header toggles every location on the current page).
• Optionally override SSID, Captive Portal, or Message per location; empty fields inherit the organization defaults.
• Inherited values appear dimmed, and an inherited portal shows as a chip that cannot be removed. Clearing an override restores inheritance.
• A location that has never been saved on this tab starts Enabled when Activate for new locations is on. Once you save this tab, every location keeps its own setting, so later changes to Activate for new locations affect only locations created afterwards.
• Click Save.
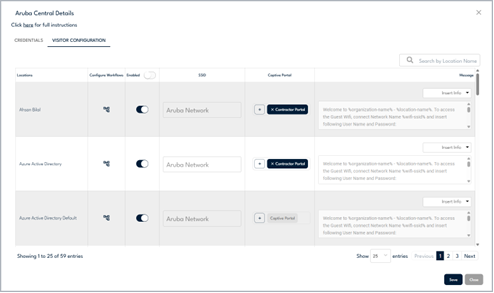
Figure 22. Visitor Configuration tab: per-location settings with the Configure Workflows column, search, and pagination.
Per-workflow overrides (optional)
• Click the icon in the Configure Workflows column to open that location's active check-in workflows (visitor types). Language variants of a workflow share the parent workflow's setting.
• You can search by workflow name and move between pages without losing edits; one Save applies every change.
• Each workflow defaults to Enabled and inherits the location configuration; override SSID, Captive Portal, or Message per workflow. Empty fields inherit the location, then organization values.
• Toggle Enabled per workflow to control which workflows issue Wi-Fi credentials (the header switch toggles all workflows on the current page).
• Click Save in the dialog. Workflow changes are saved immediately and do not require saving the integration again.
• Pair with one SSID and captive portal per privilege level (section 3.5) to give different workflows different network access.
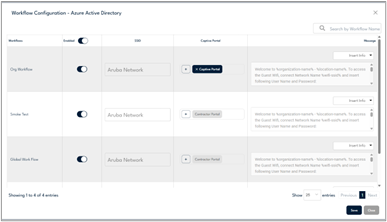
Figure 23. Workflow Configuration dialog: per-workflow overrides for a location.
Guest account behavior
• Username: the visitor's mobile number as captured at check-in (digits only). If the visitor has no number but is linked to an employee, the employee's number is used; otherwise the visitor's name plus a short random suffix.
• The SMS is sent only to the visitor's own number.
• Password: an 8-digit numeric code, generated per visit.
• Validity: the kiosk's automatic check-out interval (Kiosk settings > Enable Check-out Text > Time Until Auto Check-out (Minutes)), or the workflow's Override Auto Checkout Time when one is set, rounded up to whole days (minimum 1 day). Without a check-out interval, the account is valid for 24 hours.
• Repeat check-in: while the account is still valid, it is reused and the same credentials are sent again. After it expires, a new account replaces it and the earlier credentials stop working. Any stale account with the same username is removed before the new one is created.
• Check-out: the guest account is deleted automatically, normally within a minute; allow up to 15 minutes under heavy load.
• Deletion is skipped if the integration, the location, or the workflow is disabled at check-out time, or if the account's validity period has already passed. If Aruba Central rejects the delete request, UnDesked does not retry it.
• In each of these cases, and when a visitor never checks out, the account still stops working when its validity expires.
4.3 Configuration Validation
In UnDesked
• Fetch Portal List succeeding confirms the Customer ID, Region, and the pasted access token through a live Guest API call.
• The Client ID and Client Secret are used only when UnDesked refreshes the token, so a typo there appears later as guest creation stopping (see section 4.4). To validate them at setup, run Fetch Portal List again after the access token has expired (about two hours), or run a test check-in the next day.
• Save completes and the secrets are shown masked.
In Aruba Central
• The guest SSID is enabled and uses the Cloud Guest captive portal (Devices > Access Points > Config > WLANs).
• Splash page type is Username/Password (Guests > Splash Pages).
• After a test check-in, the account appears in the portal's Visitors tab. Optionally, verify it in API Gateway Swagger with GET /guest/v1/portals/{portal_id}/visitors.
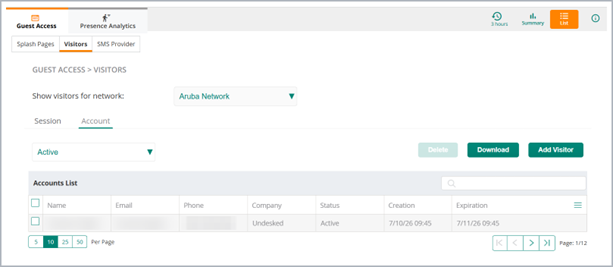
Figure 24. Visitors who received credentials and signed in successfully appear in the portal's Visitors tab.
End-to-end test (visitor device to Aruba Central)
1. Check in a test visitor with a real mobile number.
2. Confirm the SMS arrives with the SSID, username, and password.
3. Confirm the account exists in Aruba Central.
4. Join the guest SSID; confirm the splash page redirect.
5. Sign in with the SMS credentials; confirm network access.
6. Check out the visitor in UnDesked.
7. Confirm the account is removed from the portal (normally within a minute; allow up to 15 minutes under heavy load).
If per-workflow overrides are set, repeat the test with each overridden workflow and confirm the SMS and captive portal sign-in use that workflow's SSID and portal.
4.4 Troubleshooting
|
Symptom |
Likely cause |
Action |
|
Fetch Portal List shows 'Authentication with Aruba Central failed. Please verify your credentials.' |
Wrong Customer ID or Region, or an expired or already-used token file. Client ID and Client Secret are checked only when the token has to be refreshed |
Re-check Client ID, Client Secret, Customer ID, and Region; download a fresh token file. Ignore any 'Session expired! Please login again' message shown at the same time; your UnDesked session is fine |
|
Portal list is empty |
No Cloud Guest splash pages |
Create a Username/Password splash page (step A3) |
|
'Too many requests to Aruba Central. Please wait a moment and try again.' |
API Gateway rate limit (HTTP 429) |
Fetch Portal List: wait a moment and retry. Check-in: the provisioning job retries automatically after a short delay, up to three attempts |
|
No SMS received |
Any of: no mobile number captured; integration card shows Disabled; location Enabled off (or the location was created while Activate for new locations was off); workflow Enabled off in Configure Workflows; no portal resolved at any level; SMS not configured; three failed attempts (throttling or Central outage) |
Capture the number at check-in; set the card back to Connected; enable the location and the workflow; select a portal (organization default or override); verify SMS settings; retry after Central recovers |
|
No SMS at any location; the card shows Disabled |
Integration deactivated by clicking the status button |
Click Disabled to set it back to Connected, or open Configure and Save; if guest creation still fails after a long pause, download a fresh token, paste it and Save |
|
Visitor gets the SMS but cannot see the network |
SSID disabled, AP offline, or the SSID name does not match |
In Aruba Central open Devices > Access Points and check AP status; confirm the SSID is enabled and matches the Default SSID in UnDesked exactly |
|
SMS ok, sign-in rejected |
SSID uses a different splash page; validity passed; typo |
Align the SSID's portal with the one selected in UnDesked; re-check in |
|
Account not created at check-in |
Integration Disabled; broken token chain (token regenerated elsewhere); wrong Client ID / Secret found at the first refresh (next row); or missing portal |
Verify Fetch Portal List; use a dedicated System App; fresh token |
|
Guest creation worked at setup, then stopped after a few hours or the next day |
Client ID or Client Secret typo (they are used only when the token is refreshed), or the System App token was regenerated or revoked in Central |
Fix Client ID / Client Secret, download a fresh token, paste it, Save. UnDesked does not alert administrators when the token chain breaks; schedule a periodic test check-in |
|
Account remains after the visit |
Visitor never checked out; or Aruba Central rejected the check-out deletion (for example, throttled), so the account stays until its validity expires; or the integration, location or workflow was disabled between check-in and check-out; or check-out happened after the validity period, so UnDesked's stored reference had already expired. Rejected deletions are not retried |
None needed: it expires automatically; or check out / delete manually |
|
One location behaves differently from the others |
A per-location override on the Visitor Configuration tab |
Open Visitor Configuration; check that location's Enabled switch, SSID, portal, and message. Empty fields inherit the organization default |
|
One workflow behaves differently at a location |
A per-workflow override in the Configure Workflows dialog |
Open the location's Configure Workflows dialog (step C); check that workflow's Enabled switch, SSID, portal, and message. Empty fields inherit the location, then organization values |
|
Dialog shows GreenLake Client ID / Visitor Store instead of Client ID / Captive Portal |
The Aruba Central Platform toggle is on NEW CENTRAL |
Switch the toggle to CLASSIC CENTRAL (step B1); each platform keeps its own saved credentials |
5. Appendices
5.1 Support Model
|
Area or issue |
Contact |
How to reach |
|
Integration setup, UnDesked configuration, SMS delivery, guest account creation or deletion |
UnDesked Support |
Call +1-855-622-9369 or email support@undesked.com |
|
Aruba Central access, AP hardware, wireless coverage, captive portal platform, HPE GreenLake account |
HPE Aruba Networking Support |
HPE Networking Support Portal (networkingsupport.hpe.com), or your Aruba reseller |
|
Unclear which side the issue is on |
Start with UnDesked Support |
We triage and coordinate with HPE where needed. |
• For no SMS, wrong message content, or guest accounts not created or deleted, contact UnDesked Support.
• For an SSID not broadcasting, a splash page not loading, or Aruba Central being unreachable, contact your network administrator or HPE Aruba Networking Support.
5.2 Reference Documentation
Product documentation, support portals, and the Aruba APIs referenced by this integration:
• Aruba Central API Reference Guide
• Aruba Central OAuth (access token)
• Aruba Central Guest API - get portal
• Aruba Central Guest API - create visitor
• HPE Networking Support Portal (software end-of-life status)