
1. Overview
The Aruba Central integration connects UnDesked with HPE Aruba Central so that every visitor automatically receives Guest Wi-Fi access when they check in. Once configured, the integration works in the background with no manual effort from your reception staff.
When a visitor checks in (at a kiosk or through pre-registration):
- A temporary guest account is created on your Aruba Central captive portal.
- A unique username and password are generated for the visitor.
- The visitor receives a text message (SMS) containing the Wi-Fi network name and their login credentials.
- When the visitor checks out, the guest account is removed automatically.
- An HPE GreenLake account with administrator access to your Aruba Central workspace.
- At least one wireless network (SSID) broadcast by your Aruba access points.
- Administrator access to your organization in UnDesked (Settings section, Integrations page).
- Visitors must provide a mobile phone number during check-in, since Wi-Fi credentials are delivered by SMS.
The integration is configured once at the organization level. If needed, individual locations can override the defaults (for example, a different Wi-Fi network name, captive portal, or welcome message per location).
1.1 Prerequisites
Before you begin, make sure you have the following:
2. Part 1: Prepare Aruba Central
In this part you will sign in to Aruba Central, confirm your Wi-Fi network and captive portal, and generate the API credentials that UnDesked needs.
|
# |
Value |
Where you will find it |
|
1 |
Client ID |
Organization > Platform Integration > System Apps & Tokens |
|
2 |
Client Secret |
Organization > Platform Integration > System Apps & Tokens |
|
3 |
Customer ID |
Profile panel (top-right user icon) |
|
4 |
Token file (JSON) |
Token List > Download Token |
|
5 |
Region |
Your Aruba Central cluster, for example US-1 |
|
6 |
Wi-Fi network name (SSID) |
Devices > Access Points > WLANs |
2.1 Sign in and Open Classic Central
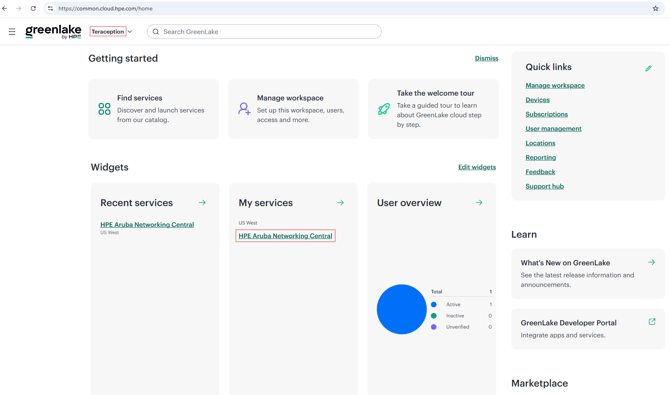
- Go to https://common.cloud.hpe.com and sign in with your HPE GreenLake account.
- In the top-left corner, make sure the correct workspace is selected (workspace selector next to the GreenLake logo).
- Under 'My services', click HPE Aruba Networking Central to launch Aruba Central.
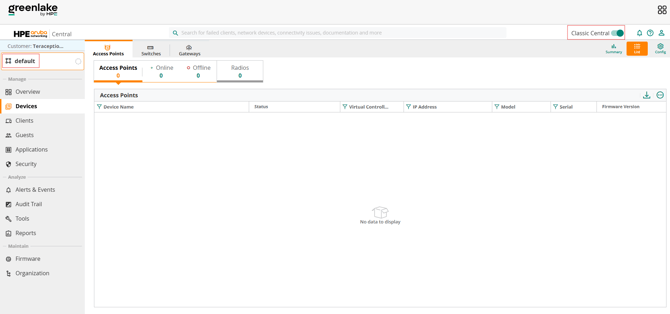
- In the top-right corner of Aruba Central, switch the 'Classic Central' toggle ON. The screens described below are from the Classic Central interface.
- In the top-left corner, select your Group (for example 'default'). All settings below apply to the selected group.
2.2 Confirm Your Wireless Network (SSID)
- In the left menu, go to Devices, then open the Access Points tab.
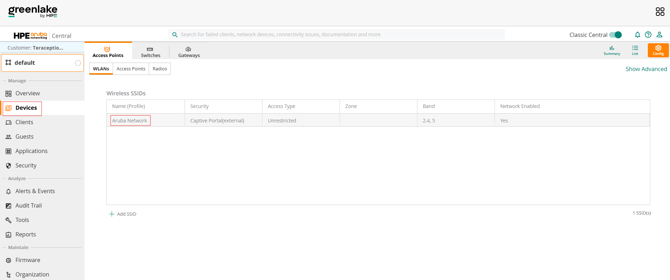
- Click the Config (gear) icon in the top-right, then open the WLANs tab.
- Confirm the wireless network your visitors will use exists and is enabled. Note its exact name (SSID), you will enter it in UnDesked later.
- The network's Security should be set to a Captive Portal (external), so that guests sign in through the portal.
- If you do not have a suitable network yet, click '+ Add SSID' and create one.
2.3 Confirm Your Captive Portal (Splash Page)
The captive portal is the sign-in page visitors see when they connect to the guest Wi-Fi. UnDesked creates the visitor's guest account on this portal.
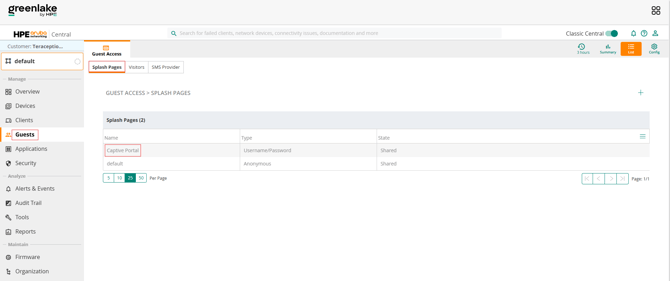
- In the left menu, go to Guests.
- Open the Splash Pages tab. The list shows your existing captive portals.
- Confirm you have a portal of type 'Username/Password'. This is required, because UnDesked generates a username and password for each visitor.
- Note the portal name. You will select it in UnDesked later using the 'Fetch Portal List' button.
- If you do not have one, click the '+' icon to create a new splash page of type Username/Password.
2.4 Generate API Credentials (Client ID, Client Secret, Token)
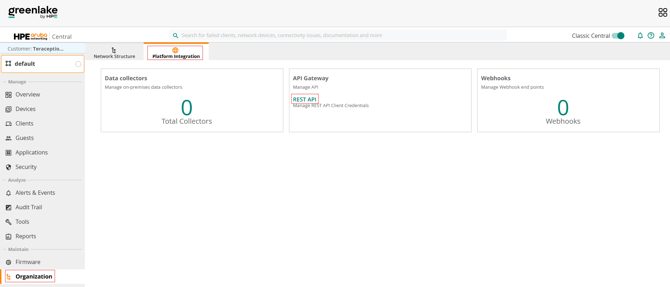
- In the left menu, go to Organization.
- Open the Platform Integration tab, then click REST API under API Gateway.
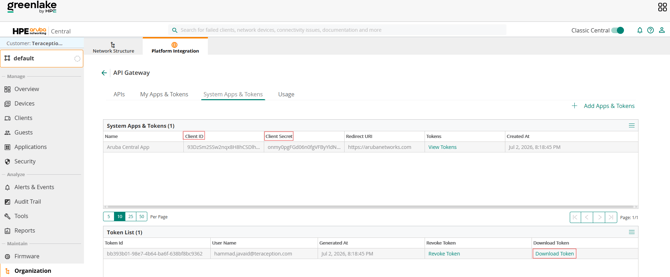
- Open the System Apps & Tokens tab.
- Click '+ Add Apps & Tokens' to create a new app for UnDesked.
- Once created, the app appears in the System Apps & Tokens table. Copy the Client ID and Client Secret from the table row.
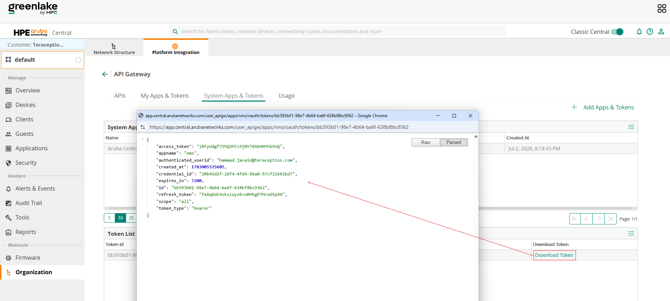
- In the Token List below, find the token generated for your app and click 'Download Token'. This saves a small JSON file containing the access and refresh tokens. Keep this file, you will paste its contents into UnDesked.
|
IMPORTANT The downloaded token file can only be used once to set up the integration. If you ever need to reconfigure from scratch, generate and download a fresh token. |
2.5 Find Your Customer ID
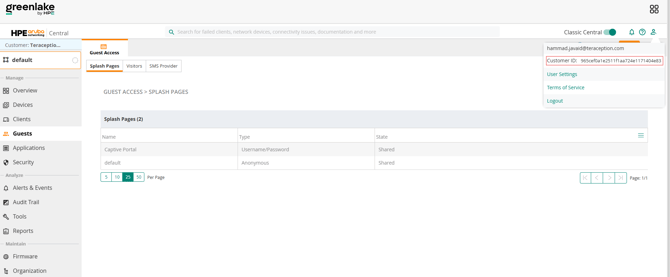
- In Aruba Central, click the user (profile) icon in the top-right corner.
- Your Customer ID is shown in the account details panel. Copy it.
2.6 Identify Your Region
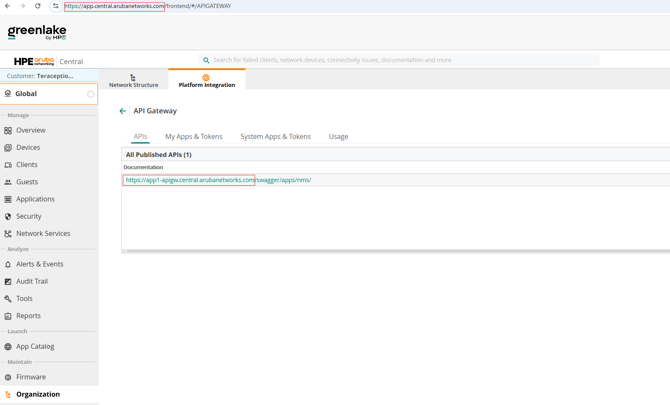
UnDesked needs to know which regional Aruba Central cluster your account is hosted on. The easiest way to find it is through the API Gateway page:
- In Classic Central, go to Organization, open the Platform Integration tab, and click REST API.
- Open the APIs tab. It lists the API documentation links for your cluster.
- Look at the domain in those links (for example https://app1-apigw.central.arubanetworks.com).
- You will know your region from the domain or from the URL.
|
Domains |
Regions |
|
app1-apigw.central.arubanetworks.com |
US-1 |
|
apigw-prod2.central.arubanetworks.com |
US-2 |
|
apigw-us-east-1.central.arubanetworks.com |
US-East1 |
|
apigw-uswest4.central.arubanetworks.com |
US-West4 |
|
apigw-uswest5.central.arubanetworks.com |
US-West5 |
|
eu-apigw.central.arubanetworks.com |
EU-1 |
|
apigw-eucentral2.central.arubanetworks.com |
EU-Central2 |
|
apigw-eucentral3.central.arubanetworks.com |
EU-Central3 |
|
apigw-ukwest2.central.arubanetworks.com |
UK-West2 |
|
apigw-ca.central.arubanetworks.com |
Canada-1 |
|
apigw.central.arubanetworks.com.cn |
China-1 |
|
api-ap.central.arubanetworks.com |
APAC-1 |
|
apigw-apaceast.central.arubanetworks.com |
APAC-EAST1 |
|
apigw-apacsouth.central.arubanetworks.com |
APAC-SOUTH1 |
|
apigw-uaenorth1.central.arubanetworks.com |
UAE-NORTH1 |
|
TIP You can also check the address bar while using Aruba Central: a plain app.central.arubanetworks.com address means US-1, while other clusters show a suffix, for example app-prod2 (US-2) or app-eucentral3 (EU-Central3). If you are still unsure, contact your network administrator or HPE support. |
3. Part 2: Configure the integration in UnDesked
3.1 Open the Aruba Central Integration
- Sign in to UnDesked as an organization administrator.
- Make sure you are at the organization level (select your organization, not a specific location).
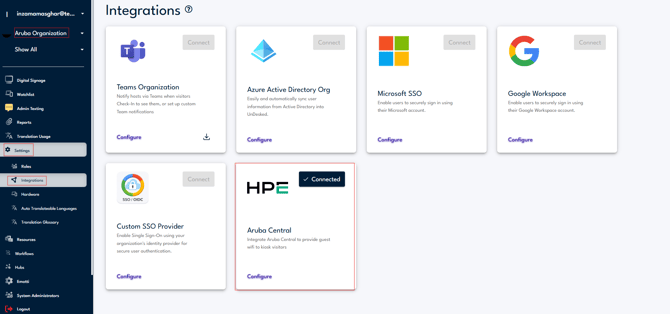
- Go to Settings, then Integrations.
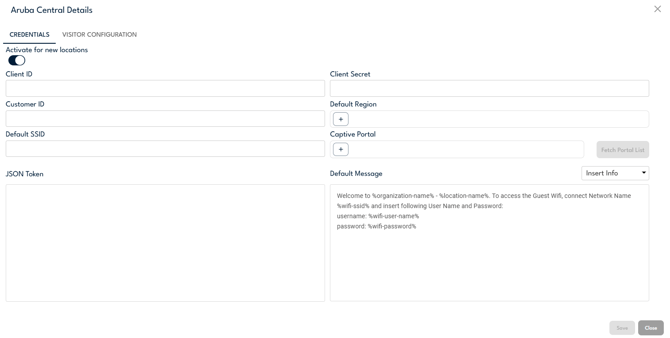
- Find the Aruba Central card and click it. The 'Aruba Central Details' dialog opens on the Credentials tab.
3.2 Fill in the Credentials Tab
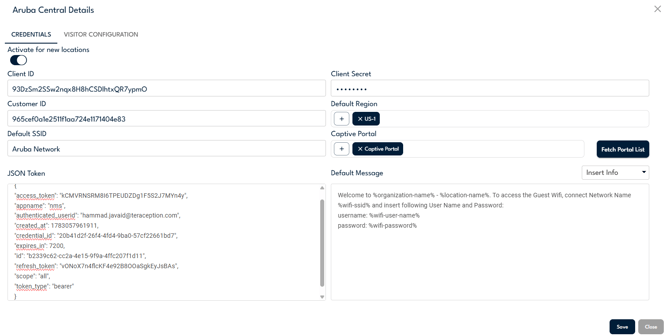
Enter the values you collected in Part 1:
|
Field |
What to enter |
|
Activate for new locations |
Leave ON (recommended) to automatically enable guest Wi-Fi for any location added in the future. Turn OFF if new locations should stay disabled until you enable them manually. |
|
Client ID |
The Client ID from Aruba Central (System Apps & Tokens). |
|
Client Secret |
The Client Secret from Aruba Central (System Apps & Tokens). |
|
Customer ID |
Your Aruba Central Customer ID. |
|
Default Region |
Click '+' and select your Aruba region (for example US-1). |
|
Default SSID |
The exact name of your guest Wi-Fi network (from step 2.2). Visitors will see this name in their credentials message. |
|
Captive Portal |
Selected in the next step using 'Fetch Portal List'. |
|
JSON Token |
Open the token file you downloaded in step 2.4 with any text editor, copy its full contents, and paste them into this box. |
|
Default Message |
The text message visitors receive with their Wi-Fi credentials. A ready-made template is provided. You can personalize it, see section 3.4. |
3.3 Fetch and Select the Captive Portal
- After filling in the Client ID, Client Secret, Customer ID, Region, and JSON Token, the 'Fetch Portal List' button becomes active. Click it.
- UnDesked connects to Aruba Central and loads your captive portals.
- Click '+' next to the Captive Portal field and select the portal you confirmed in step 2.3 (the Username/Password portal).
- If the list fails to load, double-check the credentials and region, then try again.
3.4 Personalize the Default Message (optional)
The Default Message is the SMS your visitors receive. It supports placeholders that are replaced with real values for each visitor. Use the 'Insert Info' dropdown above the message box to insert them, or type % inside the message box to see suggestions.
|
Placeholder |
Replaced with |
|
%wifi-ssid% |
The Wi-Fi network name (SSID) |
|
%wifi-user-name% |
The visitor's generated Wi-Fi username |
|
%wifi-password% |
The visitor's generated Wi-Fi password |
|
%organization-name% |
Your organization name |
|
%location-name% |
The location the visitor checked in at |
|
%visitor-name% |
The visitor's name |
|
%host-name% |
The host the visitor is meeting |
|
%checkpoint-name% |
The kiosk / checkpoint name |
|
%cellnum% |
The visitor's phone number |
|
%additional-info-(company)% |
The visitor's company |
|
IMPORTANT Always keep %wifi-ssid%, %wifi-user-name%, and %wifi-password% in the message. Without them, visitors will not receive their login details. |
3.5 Save
- Click Save. The Save button is enabled once all required fields, including the JSON Token, are filled.
- The dialog now also shows a second tab, 'Visitor Configuration', where you can adjust individual locations (see Part 3).
|
NOTE After saving, the Client Secret and tokens are stored securely and shown as masked dots. You do not need to re-enter them when editing other fields later. Tokens are refreshed automatically, no ongoing maintenance is required. |
4. Part 3: Per-Location Settings (Visitor Configuration)
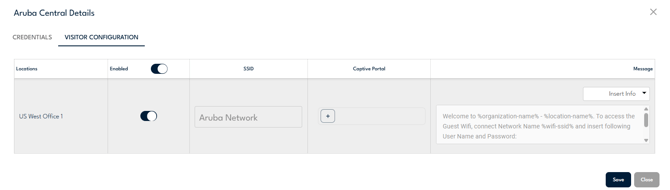
By default, every location uses the organization defaults you entered on the Credentials tab. Use the Visitor Configuration tab to enable or disable guest Wi-Fi per location, or to give a location its own SSID, captive portal, or message.
- Open the Aruba Central integration again (Settings > Integrations > Aruba Central) and switch to the Visitor Configuration tab.
- Each row represents one of your locations.
- Use the Enabled switch on a row to turn guest Wi-Fi on or off for that location. The switch in the table header turns all locations on or off at once.
- To override a default for one location, type into that row's SSID or Message field, or select a different Captive Portal. Fields left empty (showing gray placeholder text) inherit the organization default.
- Click Save.
|
NOTE Location-level administrators can also open the integration from their own location's Settings > Integrations page. There they see the same dialog scoped to their location. |
5. What Your Visitors Experience
- A visitor checks in at the kiosk or completes pre-registration, providing their mobile phone number.
- Within moments, the visitor receives an SMS based on your message template, containing the Wi-Fi network name, a username, and a password.
- The visitor connects to the guest Wi-Fi network, opens the captive portal sign-in page, and enters the username and password from the SMS.
- The guest access remains valid for the duration of the visit (based on your check-out settings).
- When the visitor checks out, their guest account is removed from the portal automatically.